Архив метки: Python

Самодельный «драйвер» для графического планшета GAOMON M106K для Linux на Python

Для графического планшета GAOMON M106K пару лет назад драйвера для Linux не было. Скорее всего, до сих пор нет. Поэтому пару лет назад написал для себя скрипт на Python, с помощью которого планшет у меня заработал в Ubuntu и Raspbian.

Сначала про подготовку к запуску скрипта. Нужно будет кое-что установить (под root`ом):

# apt-get install python3-pip && \
pip3 install --upgrade pip && \
pip3 install setuptools && \
pip3 install Xlib && \
pip3 install pyautogui

Библиотека pyautogui по умолчанию работает не очень (перемещение курсора дёрганое), поэтому нужно поправить в ней один файл (версия питона может отличаться):

# cp __init__.py /usr/local/lib/python3.4/dist-packages/pyautogui/__init__.py

После этого нужно проверить в скрипте planshet.py имя файла устройства (у меня он подключался под именем /dev/hidraw2) и запустить его под root`ом (иначе не будет прав на чтение из файла устройства).

Сам «драйвер» planshet.py:

#!/usr/bin/python3
# -*- coding: utf-8 -*-
"""
"driver" for GAOMON M106K by Maxim Kuznetsov http://kmsvsr.ru
To install needed packages and modules run "install.sh" as superuser
Don`t forget to replace or edit /usr/local/lib/python.../dist-packages/pyautogui/__init__.py
before use
"sudo ./planshet.py" to run. Sudo is for access to read from device /dev/hidraw0
Works in Linux Mint 18
"""

import time
import struct
# https://pyautogui.readthedocs.io/en/latest/mouse.html#the-mousedown-and-mouseup-functions
import pyautogui


MONITOR_HEIGHT = 1050
MONITOR_WIDTH = 1400


def start_driver():
    """Open device and start to process input actions"""
    # init
    with open("/dev/hidraw2", "rb") as device_file:
        lm_pressed = False
        rm_pressed = False
        mm_pressed = False
        last_move_time = int(round(time.time() * 1000))

        # endless cycle of reading data from device
        while True:
            data = device_file.read(8) # 8 is for my GAOMON M106K
            values = struct.unpack('HHHH',data)
            print(
                f"Buttons: {hex(values[0])}; "
                f"X: {hex(values[1])}; "
                f"Y: {hex(values[2])}; "
                f"Press: {hex(values[3])}"
            )
            # https://stackoverflow.com/questions/1181464/controlling-mouse-with-python
            current_time = int(round(time.time() * 1000))
            deadline_time = last_move_time + 15
            if deadline_time < current_time:
                x_pos = values[1] * MONITOR_WIDTH / 0x7fff
                y_pos = values[2] * MONITOR_HEIGHT / 0x7fff
                buttons = values[0]
                press = values[3]
                pyautogui.moveTo(x_pos, y_pos)
                last_move_time = current_time
                # Left mouse button is touch by pen
                if press > 0:
                    if not lm_pressed:
                        pyautogui.mouseDown(button='left')
                        lm_pressed = True
                else:
                    if lm_pressed:
                        pyautogui.mouseUp(button='left')
                        lm_pressed = False

                # Right mouse button is touch by pen with bottom button on it
                if buttons == 0xc20a:
                    if not rm_pressed:
                        pyautogui.mouseDown(button='right')
                        rm_pressed = True
                else:
                    if rm_pressed:
                        pyautogui.mouseUp(button='right')
                        rm_pressed = False

                # Middle mouse button is touch by pen with top button on it
                if buttons == 0xc40a:
                    if not mm_pressed:
                        pyautogui.mouseDown(button='middle')
                        mm_pressed = True
                else:
                    if mm_pressed:
                        pyautogui.mouseUp(button='middle')
                        mm_pressed = False


if __name__ == "__main__":
    start_driver()

Весь «драйвер» получился чуть больше 50 строчек кода. Может быть кому-нибудь пригодится подключить так же другую модель планшета или ещё какое-нибудь необычное устройство ввода, для которого нет нормального драйвера под Linux.

Из недоделок: не работают кнопки на планшете, либо они подключаются другим устройством, либо через /dev вообще не доступны, лишку не разбирался.

Python: шапка скрипта для быстрой отладки и профилирования

# -*- coding: utf-8 -*-
import datetime
import sys

TIME_START = datetime.datetime.now()

def my_debug(txt):
    #print('%s - %s' % (datetime.datetime.now() - TIME_START, txt))
    pass
        
def my_info(txt):
    print('%s - %s' % (datetime.datetime.now() - TIME_START, txt))
    pass
        
        
my_info("Python")        
my_info("Начали") 

Python: цветной текст в консоли

Здесь предлагают импользовать 2 варианта.

Первый — использовать ansi. Здесь будет нужен какой-то справочник, чтобы с ними разобраться:

print('\033[96mКак поменять цвет?\033[0m')
print('Как поменять цвет ' + '\033[96mодного\033[0m' + ' слова?')

Второй способ — импортировать библиотеку colorama:

Type "help", "copyright", "credits" or "license" for more information.
>>> import colorama
>>> from colorama import Fore, Back
>>> colorama.init()
>>> print(Back.BLUE + Fore.GREEN + "text")
text
>>> quit()  

Попробовал — библиотеку в ubuntu отдельно устанавливать не пришлось, уже была в наличии. В использовании проще первого варианта.

Прохождение квеста по запуску OpenGL для Python3

Оказалось, что если просто взять и открыть первый попавшийся урок по OpenGL на Python, то скорее всего ничего не получится. Всё пробовал на Python 3.6.5 под Windows x64. Для начала. пробуем установать пакеты, которые используются в скриптах:

\Python36\python.exe -m pip install PyOpenGL
Collecting PyOpenGL
  Using cached PyOpenGL-3.1.5-py3-none-any.whl (2.4 MB)
Installing collected packages: PyOpenGL
Successfully installed PyOpenGL-3.1.5
\Python36\python.exe -m pip install PyOpenGL-accelerate
Collecting PyOpenGL-accelerate
  Using cached PyOpenGL_accelerate-3.1.5-cp36-cp36m-win_amd64.whl (329 kB)
Installing collected packages: PyOpenGL-accelerate
Successfully installed PyOpenGL-accelerate-3.1.5

Теперь попробуем выполнить скрипт из примеров примерно с таким содержимым:

from OpenGL.GL import *
from OpenGL.GLUT import *
from OpenGL.GLU import *
...
glutInit()
...

Результат получится примерно такой:

\Python36\python.exe testopengl.py
Traceback (most recent call last):
  File "testopengl.py", line 30, in <module>
    glutInit()
  File "Python\Python36\lib\site-pac
kages\OpenGL\GLUT\special.py", line 333, in glutInit
    _base_glutInit( ctypes.byref(count), holder )
  File "Python\Python36\lib\site-pac
kages\OpenGL\platform\baseplatform.py", line 425, in __call__
    self.__name__, self.__name__,
OpenGL.error.NullFunctionError: Attempt to call an undefined function glutInit,
check for bool(glutInit) before calling

По советам из интернета скачиваем freeglut (качал отсюда https://www.transmissionzero.co.uk/files/software/development/GLUT/freeglut-MSVC-3.0.0-2.mp.zip), извлекаем оттуда и ложим рядом со скриптом файл freeglut.dll. Пробуем запустить скрипт снова — получаем ту же самую ошибку. В интернете пишут, что в стандартных пакетах питона какой-то касяк, поэтому их нужно удалить:

\Python36\python.exe -m pip uninstall pyopengl
Found existing installation: PyOpenGL 3.1.5
Uninstalling PyOpenGL-3.1.5:
  Would remove:
    python\python36\lib\site-package
s\opengl\*
    python\python36\lib\site-package
s\pyopengl-3.1.5.dist-info\*
Proceed (y/n)? y
  Successfully uninstalled PyOpenGL-3.1.5

\Python36\python.exe -m pip uninstall pyopengl-accelerate
Found existing installation: PyOpenGL-accelerate 3.1.5
Uninstalling PyOpenGL-accelerate-3.1.5:
  Would remove:
    python\python36\lib\site-package
s\opengl_accelerate\*
    python\python36\lib\site-package
s\pyopengl_accelerate-3.1.5.dist-info\*
Proceed (y/n)? y
  Successfully uninstalled PyOpenGL-accelerate-3.1.5

А теперь, говорят, надо скачивать альтернативные пакеты вот отсюда: https://www.lfd.uci.edu/~gohlke/pythonlibs/#pyopengl. Я схватился за самый свежий пакет PyOpenGL‑3.1.5‑cp39‑cp39‑win_amd64.whl, и он мне не подошёл:

\Python36\python.exe -m pip install PyOpenGL-3.1.5-cp39-cp39-win_amd64.whl
ERROR: PyOpenGL-3.1.5-cp39-cp39-win_amd64.whl is not a supported wheel on this p
latform.

Как я понял, в названии пакета 39 — это версия питона, для которого предназначен пакет, то есть мне для 3.6.5 нужны пакеты с цифрой 36:

\Python36\python.exe -m pip install PyOpenGL-3.1.5-cp36-cp36m-win_amd64.whl
Processing pyopengl-3.1.5-cp36-cp36m-win_amd64.whl
Installing collected packages: PyOpenGL
Successfully installed PyOpenGL-3.1.5

\Python36\python.exe -m pip install PyOpenGL_accelerate-3.1.5-cp36-cp36m-win_am
d64.whl
Processing pyopengl_accelerate-3.1.5-cp36-cp36m-win_amd64.whl
Installing collected packages: PyOpenGL-accelerate
Successfully installed PyOpenGL-accelerate-3.1.5

Ну и теперь пробуем запустить скрипт:

python.exe testopengl.py
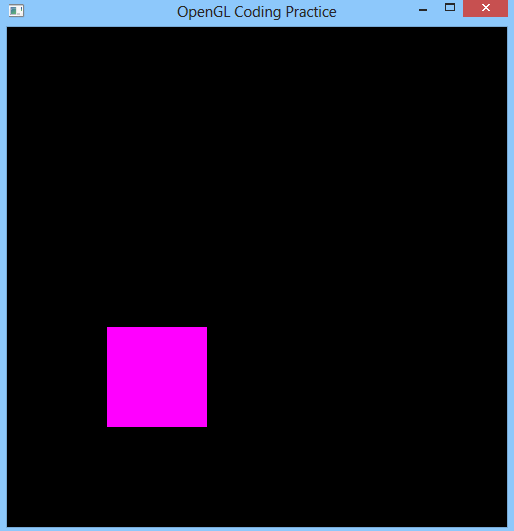
Python OpenGL
Python OpenGL

Короче победа. Все загрузки (пакеты для питона и freeglut) проверялись антивирусом, но если будете повторять — качайте на свой страх и риск.

auto-py-to-exe — компилятор питоновских скриптов для windows

Проверено на Python 3 — работает

Установка:

>c:\users\user\AppData\Local\Programs\Python\Python36\python.exe -m pip install auto-py-to-exe
Collecting auto-py-to-exe
  Downloading auto_py_to_exe-2.7.4-py2.py3-none-any.whl (74 kB)
     |████████████████████████████████| 74 kB 84 kB/s
....
Successfully installed Eel-0.11.0 altgraph-0.17 auto-py-to-exe-2.7.4 bottle-0.12
.18 bottle-websocket-0.2.9 cffi-1.14.0 future-0.18.2 gevent-20.6.0 gevent-websoc
ket-0.10.1 greenlet-0.4.16 pefile-2019.4.18 pycparser-2.20 pyinstaller-3.6 pywin
32-ctypes-0.2.0 whichcraft-0.6.1 zope.event-4.4 zope.interface-5.1.0

После успешной установки в папке Python36\Scripts\ появится auto-py-to-exe.exe, запускаем его

auto-py-to-exe
auto-py-to-exe

Выбираем скрипт, выставляем нужные настройки и жмём снизу «CONVERT .PY TO .EXE«. Появляется папка output с откомпилированным скриптом program.exe

Python скрипт для сбора информации по файлам в папке

# -*- coding: utf-8 -*-

'''
на входе папка или файл, на выходе CSV: имя файла;сумма мд5;папка полностью;имя компа
'''

import os
import hashlib
import platform
import time
import sys

class MyItem:
  def __init__(self, f):
    self.hostname = hostname
    self.md5sum = md5(f)
    self.size = os.path.getsize(f)
    self.created = "%s" % time.strftime("%Y-%m-%d %H:%M:%S", time.localtime(os.path.getctime(f)))
    self.modified = "%s" % time.strftime("%Y-%m-%d %H:%M:%S", time.localtime(os.path.getmtime(f)))
    self.ext = os.path.splitext(f)[1]
    self.full_dir, self.file_name = os.path.split(os.path.abspath(f))

def md5(fname):  # https://stackoverflow.com/questions/3431825/generating-an-md5-checksum-of-a-file
    hash_md5 = hashlib.md5()
    with open(fname, "rb") as f:
        for chunk in iter(lambda: f.read(4096), b""):
            hash_md5.update(chunk)
    return hash_md5.hexdigest()

hostname = platform.node()

result_header = "file_name;md5sum;size;created;modified;ext;full_path;hostname\n"
result_file = open('./result.csv','w')
result_file.write(result_header)

targets = []

if len(sys.argv) > 1:
  targets = sys.argv[1::]
else:
  targets.append(".")

for t in targets:
  if os.path.exists(t):
    if os.path.isdir(t):
      for current_dir, dirs, files in os.walk(t):
        for f in files:
          try:
            i = os.path.join(current_dir, f)
            print(i)
            item = MyItem(i)
            result_file.write('%s;%s;%s;%s;%s;%s;%s;%s\n'%(item.file_name, item.md5sum, item.size, item.created, item.modified, item.ext, item.full_dir, item.hostname))
          except:
            print('Error!')
    if os.path.isfile(t):
      try:
        i = t
        print(i)
        item = MyItem(i)
        result_file.write('%s;%s;%s;%s;%s;%s;%s;%s\n'%(item.file_name, item.md5sum, item.size, item.created, item.modified, item.ext, item.full_dir, item.hostname))
      except:
        print('Error!')

result_file.close()

Консольный калькулятор для Windows на Python

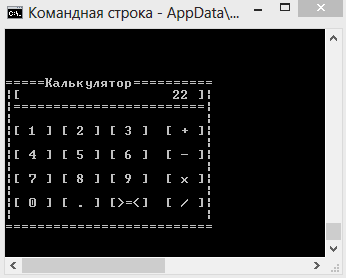
Консольный калькулятор на Python

Управление: стрелки на клавиатуре и Enter, выход из программы — Esc

Исходник calc.py:

# -*- coding: utf-8 -*-
# kmsvsr.ru 2020-06-06

import msvcrt
from decimal import *

def makeDisplayString(s):
  result = " " * (20 - len(s)) + s
  return result

class MyCalculator:
  def __init__(self):
    self.last_result = Decimal('99999999999999999999.0')
    self.result = Decimal('0.0')
    self.display_default='''
=====Калькулятор==========
|[ 00000000000000000000 ]|
|========================|
|                        |
|[ 1 ] [ 2 ] [ 3 ]  [ + ]|
|                        |
|[ 4 ] [ 5 ] [ 6 ]  [ - ]|
|                        |
|[ 7 ] [ 8 ] [ 9 ]  [ x ]|
|                        |
|[ 0 ] [ . ] [ = ]  [ / ]|
|                        |
==========================
'''
    self.display = self.display_default
    self.keys=("123+", "456-", "789x", "0.=/")

    self.ACTION_EMPTY = 0
    self.ACTION_PLUS = 1
    self.ACTION_MINUS = 2
    self.ACTION_MULTIPLY = 3
    self.ACTION_DIVIDE = 4

    self.last_action = self.ACTION_EMPTY
    
    self.visible = 1
    
    self.display_digits = "0"  # цифры, которые видно на калькуляторе, не больше 20
    self.last_display_digits = ""
    self.updateDigitsOnDisplay()
    
    # положение курсора слева сверху
    self.curx=0
    self.cury=0
    
    self.needNewDigit = 0  # 1 после кнопки действия
    
  def updateKeysOnDisplay(self):
    self.display = self.display.replace('[ %s ]' % self.keys[self.cury][self.curx], '[>%s<]' % self.keys[self.cury][self.curx])

  def updateDigitsOnDisplay(self):
    if len(self.display_digits) > 0:
      self.display = self.display.replace('00000000000000000000', makeDisplayString(self.display_digits) )
    else:
      self.display = self.display.replace('00000000000000000000', makeDisplayString(self.last_display_digits) )
    
  def resetDisplay(self):
    self.display = self.display_default
    
  def show(self):
    self.visible = 1
    self.redraw()
    
  def redraw(self):
    self.resetDisplay()
    self.updateDigitsOnDisplay()
    self.updateKeysOnDisplay()
    if self.visible == 1:
      print(self.display)
      
  def calc(self):
    try:
      new_value = Decimal('%s' % self.display_digits)
    except:
      new_value = Decimal('99999999999999999999.0')
      
    if self.last_action == self.ACTION_PLUS:
      self.result = self.last_result + new_value
    if self.last_action == self.ACTION_MINUS:
      self.result = self.last_result - new_value
    if self.last_action == self.ACTION_MULTIPLY:
      self.result = self.last_result * new_value
    if self.last_action == self.ACTION_DIVIDE:
      self.result = self.last_result / new_value
    if self.last_action == self.ACTION_EMPTY:
      self.result = new_value
    if self.last_action != self.ACTION_EMPTY:
      self.display_digits = "%s" % self.result
    self.last_result = self.result
    self.needNewDigit = 1
    self.last_display_digits = self.display_digits
    
'''
 H
KPM
'''

calc = MyCalculator()

calc.show()

while True:
  if calc.needNewDigit == 1:
    calc.display_digits = ""
    calc.needNewDigit = 0
  lastkey = msvcrt.getch()
  #print(lastkey)
  if lastkey == b'\x1b':  # Esc
    break
  if lastkey == b'K':  # left
    if calc.curx > 0:
      calc.curx -= 1
    calc.updateKeysOnDisplay()
  if lastkey == b'P':  # down
    if calc.cury < 3:
      calc.cury += 1
    calc.updateKeysOnDisplay()
  if lastkey == b'M':  # right
    if calc.curx < 3:
      calc.curx += 1
    calc.updateKeysOnDisplay()
  if lastkey == b'H':  # up
    if calc.cury > 0:
      calc.cury -= 1
    calc.updateKeysOnDisplay()
  if lastkey == b'\r':
    #Разбираемся, какая кнопка нажата на калькуляторе
    selected = calc.keys[calc.cury][calc.curx]
    if calc.curx < 3 and calc.cury < 3:  # цифры больше 0
      newd = selected  # новая нажатая цифра
      if calc.display_digits == "0":
        calc.display_digits = newd
      elif len(calc.display_digits) < 20:
        calc.display_digits += newd
    if calc.curx == 0 and calc.cury == 3:  # 0
      if calc.display_digits != "0" and len(calc.display_digits) < 20:
        calc.display_digits += selected
    if calc.curx == 1 and calc.cury == 3:  # . (точка)
      if len(calc.display_digits) < 20 and '.' not in calc.display_digits:  
        calc.display_digits += selected
    #.needNewDigit  
    #.last_action
    if calc.curx == 3 and calc.cury == 0:  # +
      calc.calc()
      calc.last_action = calc.ACTION_PLUS
    if calc.curx == 3 and calc.cury == 1:  # -
      calc.calc()
      calc.last_action = calc.ACTION_MINUS
    if calc.curx == 3 and calc.cury == 2:  # x
      calc.calc()
      calc.last_action = calc.ACTION_MULTIPLY
    if calc.curx == 3 and calc.cury == 3:  # /
      calc.calc()
      calc.last_action = calc.ACTION_DIVIDE
    if calc.curx == 2 and calc.cury == 3:  # =
      calc.calc()
      calc.last_action = calc.ACTION_EMPTY

  print('\n'*25)
  calc.redraw()

Скачать: Скачать

Python: чтение нажатия кнопок в консоли Windows

import msvcrt
msvcrt.getch()
b’f’
msvcrt.getch()
b’\xe0′
msvcrt.getch()
b’M’
msvcrt.getch()
b’\xe0′
msvcrt.getch()
b’H’
msvcrt.getch()
b’\r’
for i in range(0,5):
… msvcrt.getch()

b’1′
b’f’
b’5′
b’\r’
b’\xe0′

Шпаргалка по типам данных в Python

Text Type: str
Numeric Types: int, float, complex
Sequence Types: list(список), tuple(кортеж), range
Mapping Type: dict(словарь)
Set Types: set, frozenset
Boolean Type: bool
Binary Types: bytes, bytearray, memoryview
x = "Hello World" str
x = 20 int
x = 20.5 float
x = 1j complex
x = ["apple", "banana", "cherry"] list(список)
x = ("apple", "banana", "cherry") tuple(кортеж)
x = range(6) range
x = {"name" : "John", "age" : 36} dict(словарь)
x = {"apple", "banana", "cherry"} set
x = frozenset({"apple", "banana", "cherry"}) frozenset
x = True bool
x = b"Hello" bytes
x = bytearray(5) bytearray
x = memoryview(bytes(5)) memoryview

Python: как узнать размер окна терминала консоли в Windows и Linux

Windows

Найдено здесь: https://code.activestate.com/recipes/440694-determine-size-of-console-window-on-windows/

from ctypes import windll, create_string_buffer

# stdin handle is -10
# stdout handle is -11
# stderr handle is -12

h = windll.kernel32.GetStdHandle(-12)
csbi = create_string_buffer(22)
res = windll.kernel32.GetConsoleScreenBufferInfo(h, csbi)

if res:
    import struct
    (bufx, bufy, curx, cury, wattr,
     left, top, right, bottom, maxx, maxy) = struct.unpack("hhhhHhhhhhh", csbi.raw)
    sizex = right - left + 1
    sizey = bottom - top + 1
else:
    sizex, sizey = 80, 25 # can't determine actual size - return default values

print sizex, sizey

Проверил, работает

Linux

>>> import os
>>> os.get_terminal_size()
os.terminal_size(columns=80, lines=24)
>>> os.get_terminal_size().columns
80
>>> os.get_terminal_size().lines
24
>>>